4 Ways to Waterproof Wood Outdoor Furniture
Mar 15, 2024

4 Ways to Waterproof Wood Outdoor Furniture
Problems with Non-Waterproofed Furniture
Humidity, rain and generally any kind of moisture will wreak absolute havoc on non-waterproofed wood furniture. The first and most obvious issue is going to be mold or mildew. Mold on wood can come in several different forms, but it usually has a dark, speckled appearance. Not only can this be extremely off-putting for anyone wanting to make use of the furniture, it can also have serious health repercussions. Mold does not damage the wood directly, but someone with an allergy to the mold can have a very serious adverse reaction. Anything from itchy eyes to strained breathing. If you notice mold forming on your wood furniture, it is strongly recommended that you clean it as soon as possible for these reasons. In addition to mold, another common problem you may face with wet outdoor furniture is warping. Warping is when two or more sections of wet wood dry at different paces. This causes the wood to shrink disproportionately, and ultimately to ‘bend’ out of shape.
Minor instances of warping can often be mediated, with the right tools. If the warping is serious, however, there is a good chance the damage is irreversible. At this point your best bet is just to get new furniture. The last potential problem caused by moisture is rotting. If your furniture is exposed to moist weather long term with no form of protection in place, it’s not a rare occurrence for it to rot. Rotting is another irreversible issue, and your best bet, aside from waterproofing your furniture to prevent the issue from happening in the first place, is to replace rotted furniture, as this can cause the furniture to become unstable which can obviously lead to injuries in seating items.
Do You Need to Worry About Water Damage?
Depending on what type of wood your outdoor furniture is made out of, you may not actually need to concern yourself with waterproofing your furniture. Some types of wood furniture, like natural teak, for example, have natural, water-resistant properties out of the box. This means items made from this type of wood will not need any sealing or finishing to stand up to the weather.
Teak is not the only type of wood that’s water-resistant. To name a few more;
- Robinia pseudoacacia
- Iroko
- Merbau
- Cumaru
- Peroba
- Elm
- Ipe
- Larch
- Balau
Be sure to double check if your furniture is made from one of these types of wood before worrying about adding sealant or finish to waterproof your items.
How to Waterproof Your Wood Outdoor Furniture
If your furniture is not made from one of the aforementioned naturally water-resistant woods, you still have options to waterproof it. Generally, all of these options involve adding a finish. There are many different types of finishes and top coats available for relatively low prices compared to purchasing entirely new furniture. So, what are they? Varnish, lacquer and sealants are great options, just to name a few. We’ll explore each option more in-depth, but in order to add water resistance to your furniture it will be an additional top coat, in some form or another. In addition to the above options, you can also use natural oils like those derived from the linseed or tung oil plants to create your own finish for the highest quality outcome. Even though there are many options, each of them has their own use case, and what will work best for your items comes down to your specific circumstances. For example; what your furniture is made of, if it gets a lot of sun exposure, what color the furniture is and so on. It’s worth noting that most finishes will yellow over time, but there are a few that resist yellowing in addition to water. If you really want to avoid yellowing, be sure to do thorough research before purchasing any finish.
Varnish
Varnish, although one of the more popular options, has its pros and cons. Different varnishes contain different ingredients, they always contain a combination of drying oil, solvent and resin. It provides ample protection against rain and moisture, and is one of the best choices for UV protection.
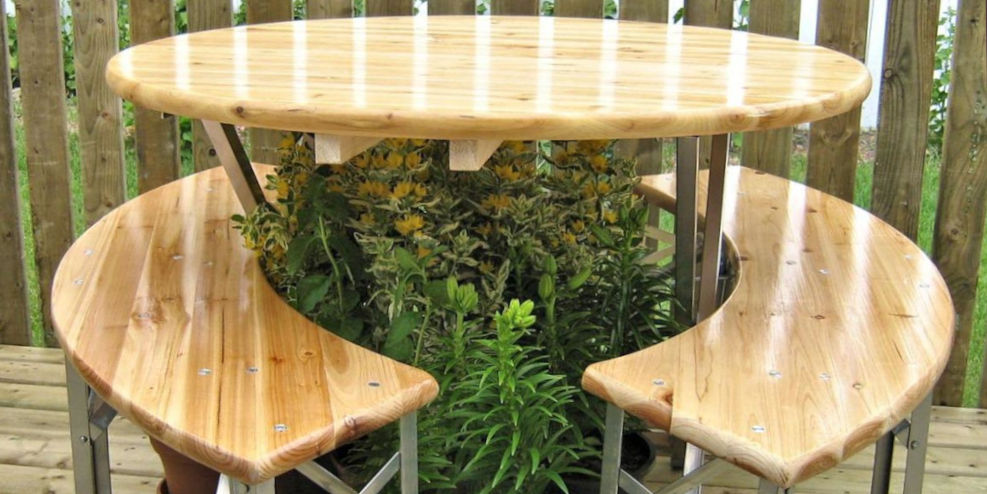
A wood outdoor table with a varnish finish Unlike most top coats, varnish will actually soak into the wood, rather than covering the grain. This contributes to the color enhancements seen after applying it, and will usually make it appear as more of a ‘saturated’ color. Adding varnish may cause an unfinished wood item that looks near white to gain a yellow-ish or even brown hue. If you’re not trying to alter the appearance of your furniture, namely in color, it is probably not the best option for you. To find a varnish with minimal color-changing effects, choose a ‘catalyzed’ varnish. On the other hand, if your items could use a makeover, varnish could be what you’re looking for. Varnish is also one of the best ways to achieve a natural appearance. This means even though it will likely alter the color of your wood, it is a clear finish choice. Some variations may add a glossy or even plastic-like ‘overlay,’ varnish is a good choice if you’re trying to preserve the texture of the furniture, because it soaks into the wood.
Some types are better than others, but pretty much all varnish will yellow overtime when it’s exposed to the sun for long periods.
How to Add Varnish to Your Items
Varnish is a particularly delicate finish compared to others. When the application isn’t near perfect, it becomes susceptible to cracking and peeling. This doesn’t mean that the finished product will not stand up to the elements as well, but to ensure a long-lasting top coat be sure to take your time and follow all the recommendations. It obviously won’t affect your finish, but wearing a respirator is advised as varnishing involves the use of thinner. Extended exposure to these chemicals can be toxic to your health. Important: Be sure not to shake your varnish, as this can cause air bubbles that stick around even after the finish dries. If your furniture already has a coat of varnish, before applying more, be sure to remove the old coat by sanding it. Varnishing over old varnish can cause it to not cure properly and subsequently not last. Varnish, due to its absorbing-properties, is difficult to remove if you need to start over, so it’s best to take it slow and try your best to do it right the first time.
The recommended temperature for the application falls between 70 and 75 degrees fahrenheit. This makes it ideal to apply inside, at room temperature with the windows open to prevent inhaling any fumes. Applying it outside may or may not be a good idea, depending on what the weather is like. Low temperatures can cause issues with curing, while high temperatures can cause the varnish to set too quickly. It is a good idea to clean your workspace as much as possible before beginning the application. Dust, hair and other airborne debris can be the biggest obstacle(s) of a good varnish job. Begin by sanding your wood. It’s important to get rid of pesky imperfections and blemishes. Again, after sanding you should clean the space.
The recommended tool for applying the varnish is typically a paint brush, (natural bristles are the best for this, but do a little research for what bristle type to use, as different types of varnish can benefit from different types of brushes,) but you can also use a roller and pad or in some cases even spray it on. Once you have your application tool selected, at this point you need to thin your first coat of varnish. This is known as a sealer coat. It’s worth noting you will end up needing multiple coats, and the first coat will need to be thinner than the subsequent coats. If your varnish came in a spray can, you likely don’t need a sealer coat. Double check to make sure. To thin your varnish, start by stirring the varnish in the can. Be careful not to shake the container.
Get an empty container, pour enough varnish for your first coat. Many recommend starting small, because you can add more if you need it later. Now, you need to add thinner. A popular choice of thinner is turpentine, but mineral spirits can also work just as well. If you’re unsure of which to choose, contact the manufacturer of the varnish for help. Ultimately, you shouldn’t guess or estimate what ratio of thinner to add, as this can have some undesired effects on your finished product. Different varnishes need different amounts of thinner. If the can of varnish doesn’t say how much thinner to add, you can try the web, and if the answer is nowhere to be found, again you should contact the manufacturer.
After adding your choice of thinner to the varnish, stir carefully with a stirring stick. Take it slow so you don’t inadvertently form air bubbles. Once you have your sealer coat ready to go, you can begin lightly brushing your item with the mixture.
Tips for brushing on varnish:
- Use just the tip of the brush
- Go with the grain, don’t brush back and forth
- Don’t make your strokes too long, one foot at a time works best for most projects
When you have your first (sealer) coat applied, it’s time to let it dry. Generally, most varnishes will require 24 hours to dry between coats, but this is another factor that falls on the manufacturer’s recommendations. When it’s dry, sand your item again. Use a cloth to wipe any fragments created by this off the furniture. Every time you sand, before adding another coat, you will need to clean your workspace again to keep it debris-free. 280-Grit sandpaper is recommended for the first coat. Sanding each coat (except the last coat) of varnish helps to ensure a level, even finish without bumps or dips. You can now begin on your next coat. This one does not need to be thinned, nor do any of the next coats. Only the first sealer coat needs thinner added, and again that’s only if it’s not spray-on varnish. Once the second coat is on and dried, you should sand this coat too, and clean up again after. Yet another factor that varies from product to product: how many coats should you apply total? This also depends on the item you’re covering, the conditions it’s exposed to and the appearance you’re after. More coats will make the item look a bit more glossy and saturated, and also better protect the wood. One thing to note; the more coats you add, the easier it can be to make a mistake. Generally, 4-5 coats total (including the sealer coat) is the recommended number. This is definitely something you should check into before making a decision on, both with the manufacturer and online. It’s a good idea to let your varnish dry for twice as long as you normally would before adding the final coat. The final step in this process is to let the item cure. Depending on the varnish you used, curing could take anywhere from one to seven days. Some varnishes need up to 30 days to cure. Be sure to check the recommendations for the product you used, and leave the item somewhere it won’t be disturbed.
Your furniture is now protected by varnish!
Lacquer
Another great option for protecting your wood furniture from the various damages caused by the outdoors is lacquer. A wood dresser with a lacquer finish Lacquer is made mainly of shellac dissolved in alcohol, and some other ingredients that can vary from product to product. It’s worth noting that because of the way it’s made, lacquer has flammable properties, which can be intensified by improper application. To minimize the risks of combustion, on a professional level, it’s typically sprayed on in a spray booth to reduce overspray. DIY projects are typically done indoors in general however, even if they’re being sprayed. Be extra careful when working with lacquer. Lacquer does not work well on open-grain woods such as oak. Take note of what your furniture is made of before choosing varnish as your finish.
Lacquer vs Varnish
Lacquer is similar to varnish, in the sense that they both provide a glossy finish, but because of its different chemical-composition, there are a handful of key differences. While lacquer creates a very glossy finish, varnish is usually much less glossy. Lacquer is more durable than varnish, and more difficult to damage after it’s been applied. If your items see a lot of physical wear and tear such as abrasions, lacquer is probably the way to go. Varnish, however, is often seen as more resistant to the effects of the sun than lacquer. For example, lacquer yellows quicker than varnish, even though it still takes long-term sun exposure. Depending on which lacquer product you choose, chances are it will have less resistance to UV damage. That doesn’t mean lacquer can’t protect your items from the sun. Some manufacturers are better than others for this, but in most cases varnish is a better choice for sun-resistance. On the other hand, lacquer is in most cases a better choice for water resistance. While varnish is usually brushed on, lacquer is commonly sprayed. You will need to purchase a specific type of lacquer made for brushing if this is the route you want to go. Do not try to brush on spray lacquer, as the spray versions dry too fast to be suitably brushed on and therefore leave you no time to clean up the piece.
The final big difference between lacquer and varnish is that lacquer generally requires less coats, this varies from product to product though. This can make the application much faster and easier. It also dries much quicker than varnish, this can be seen as an advantage or disadvantage depending on how long you usually spend cleaning the job up when it’s done
How to Apply Lacquer to Your Furniture
Note that different lacquers may or may not require thinning. If you do thin your lacquer, take that into account when choosing how many coats you will need. The instructions for applying spray lacquer strongly differentiates from those for brush-on lacquer. Either way, like with all finishes, the first step will be to clean up your workspace. Additionally, consider gloves and a mask, especially if you’re going to be working with spray lacquer. The ideal temperature for applying lacquer is around 70 degrees fahrenheit. If you try to apply it in an environment that’s too cold you will likely notice an increase in the viscosity. Conversely, if you do it when it’s too hot, the viscosity will decrease. Viscosity is how much the fluid resists flowing / running. Sprayed lacquer in an environment that is too hot will dry almost instantly, and cause you to almost inevitably overspray. Avoid moist areas as well. Ultimately, lacquer applied at the wrong temperature can be more susceptible to damage and cracking to the finish, which defeats the purpose as one of lacquer’s best qualities is its resistance to damage. Start the application by sanding your piece of furniture to achieve even edges. If your furniture has any holes, it’s a good idea to use what’s called a lacquer filler, as normal fillers may not work well with lacquer because of its chemical composition. When you’re done sanding, clean up the now-sanded surfaces as well as your workspace, to minimize airborne debris. It’s generally advised to sand the item once with medium-grit sandpaper, then again with fine-grit. Although not entirely necessary, and the recommendation will vary between different products, it is strongly advised to add a lacquer-primer coat before applying. When you’re done with your primer, sand the surface again. At this point, the next steps will depend on whether you chose to spray on your lacquer or brush it on. The procedures are obviously different.
Tips for Sprayed Lacquer
In this short tutorial, we’ll assume you’ll be working with aerosol-based lacquer from a can. If you’re using a spray nozzle to apply your finish, these steps may or may not apply, so be sure to do a little extra research. Lacquer in aerosol form is probably the easiest-to-work-with and most forgiving form of sprayed lacquer. If you opt for a spray-gun solution, you will need to add thinner to your lacquer.
- Important: Remember that most forms of lacquer are highly flammable, this is especially true for aerosol.
- Never apply lacquer in the vicinity of any type of flame, including pilot lights.
- If you’re spraying indoors, be sure you are in a space with good ventilation, such as one with open windows or doors. The temperature of your workspace should be close to 70 degrees fahrenheit.
- Start by shaking the can, you should hear the agitator balls moving around inside the can before you begin spraying.
- Swirling the can in a circular motion is another good action to take before spraying.
- Your can is now ready to spray, if you want to take it an extra step, take a random object such as cardboard or extra wood and give it a spray, if your spray is not coming out evenly, you may want to re-shake the can, or consider another product. It’s important that your stream comes out proportionally / consistently.
- Use the manufacturer’s instructions to find out what distance the can should be from the item you’re spraying.
- Note that when you spray, the can should always be the same distance away from the wood. This will help you achieve a nice, even layer of lacquer.
- Also when spraying, start your spray before actually reaching the wood, instead of starting at the end of it. If you’re worried about causing a mess in your workspace, place a cloth, tarp or anything else you don’t care about getting dirty under the item you’re spraying.
- Overlaps of a half inch are good practice for spraying aerosol lacquer. Let’s take a chair as an example; the legs are probably relatively thin. These can be done in one spray on each side of the leg. The back of a chair, however, is likely quite wide. For wider parts like this, these are the spots you want to employ overlaps.
- When you have a complete coat on your item, you can start considering how many coats total you want. With each coat, the item will become glossier, but nobody wants to spend too much time finishing their furniture. Find out how many coats you will need for a good waterproofing based on the product you chose.
- After you complete each coat and give it time to dry, you will need to sand your item again to remove imperfections in your finish.
Outmaker Instagram Network